A little back story: Hi, I'm Lisa. Many of you know my older sister Laura, who runs Maisondestencils. For years she has been telling me that she wants to have a blog, but the business keeps her too busy. I found out the fall previous that I was going to have my first child, so what better time to embark on a new project for her, right? Babies aren't a lot of work or anything. Nope! :) So we're going to be working on this blog together, sharing what we love in design.
Anyway, when I found out I was having a baby, I immediately started thinking themes for the nursery. I decided I wanted a woodlands type theme with foxes and owls. I thought the perfect piece to cap off the room would be a custom growth chart to match the room using Laura's stencils. I wanted a fox and an owl, the ruler bit would be in a tall tree, and at the top it would say, "Mighty Oaks From Little Acorns Grow."
Perfect. I drew up all the shapes in Adobe Illustrator, emailed it to her, and thought we'd have something great worked up in a week or so. That was in February 2011.
Well life got in the way! I finished the nursery and left a lonely little blank wall for the growth chart. Then June rolled around and I had the baby, my wonderful little boy, Graham.
Seasons changed, Graham got bigger and bigger, and still no growth chart. Finally in February of this year, Laura came to visit us in Oregon. She brought all kinds of treats for Graham, but the icing on the cake had to be the stencils for the growth chart. They were huge. And layered. And numerous. Totally daunting.
As Laura said to me while dragging the stencils all out of her suitcase, "Stenciling is easy. What you designed just happened to be complicated. Now aren't you glad I'm here?"
I was! Over the next few days, she showed me how to stencil and we finished the growth chart together. Here are our process pics:
We started with a large piece of laminated pine. You can find this at Home Depot, Lowes, any home improvement warehouse. Watch out for warping. Next step was painting the pine a light taupe color. Save some money by using regular indoor paint for this. Otherwise, that would be a fortune in Folk Art craft paint.
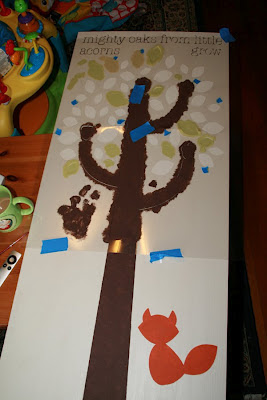
The next step was to get the bulk of the color on, the brown for the tree and text. One of the issues here was I selected a very thin typeface, so later we added in another color to make the text pop more.
Here's a shot showing the color applied to the stencil. Always tape your stencil down with painter's tape. Those extra little blue bits of tape are where I marked the color of the leaves. That shows you how left brain I am. I had to match the color to my design. Laura laughed at me for that. :) We are total opposites in many ways. The great thing about Folk Art paint is it dries very quickly, so we were able to move around the stencil and work on different things without much worry about smudging.
We didn't actually buy three different shades of green. We just tinted our original shade of green for the leaves with a little taupe to get a nice gradation.
Here you can see the blue leaves and the finished owl. We sent my colorblind husband out for the blue paint. I can't remember what we were doing that we had to stay home. He read off paint colors at Jo-Anns on the phone to me while I looked on their website. Too funny!
For hanging purposes, we decided against the sawtooth hangers pictures normally have. This is a heavy piece of wood and I just didn't want any chance of it falling in a nursery. So I ordered a keyhole router bit. Here you can see the backside of the wood clamped down before routering.
The bit just pops on the router and you plunge down and push upwards. It's that simple.
What it does is creates a channel with a narrow top where the screw head can rest without any chance of the wood slipping off of it. You always want to plunge down and push up, otherwise your screw head will just sit on the open part.
Here's a pic so you can see what I mean.
Here's our happy little growth chart hanging in its rightful spot in Graham's nursery. If it seems a little crooked, that's my elderly, leaning house, thank you very much.
Graham loves the growth chart. He stood up like a big boy next to it to get his first measurement. It doesn't hurt that he recognizes what foxes and owls are by this point and thinks they are pretty swell!
All in all, my first stenciling project was a great success. I learned a ton and had a great time doing it. Just like I hope you will with our blog.
Happy reading and let's make our worlds beautiful.


